Exploring the Salt Technique for Unique Textures in Watercolour
Discover the Beautiful Fusion of Science and Art Through Salt-Infused Magic on Paper


Introduction: Turning Simple Salt into Stunning Texture
Watercolor is full of surprises—and few are as delightfully unpredictable as the salt technique. With just a sprinkle of ordinary salt, artists can achieve crystalline textures, starburst effects, and organic patterns that mimic nature in the most fascinating ways.
Used skillfully, salt can add depth, interest, and contrast to skies, stone textures, florals, rusted surfaces, fabric patterns, and abstract compositions. It’s also a wonderful technique to loosen up your style and embrace the playful, spontaneous nature of watercolour.
In this post, we’ll dive into what makes the salt technique so unique, how to use it effectively, and where it shines best in your paintings.
1. What is the Salt Technique in Watercolour?
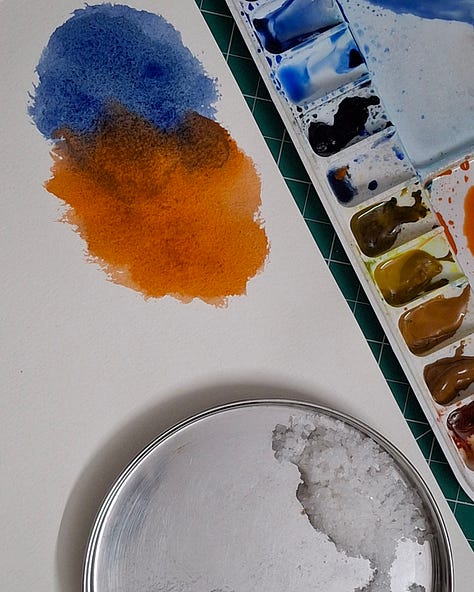
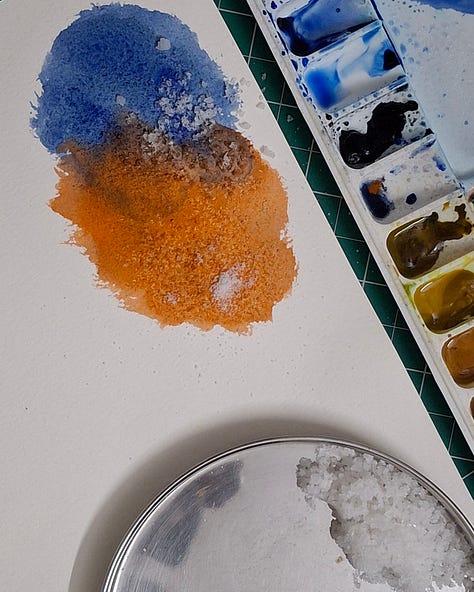
The salt technique involves sprinkling granules of salt onto wet watercolor paint. As the paint dries, the salt absorbs water and pigment, creating textured, granular patterns that resemble:
✅ Frost crystals
✅ Starbursts
✅ Coral or lichen
✅ Rock or bark textures
✅ Ethereal celestial effects
💡 It’s a fantastic way to introduce texture and surprise into your artwork.
2. How Does It Work? The Science Behind the Art
Salt is hygroscopic—it draws water toward itself. When sprinkled on wet paint:
It pulls water (and pigment) from the surrounding area
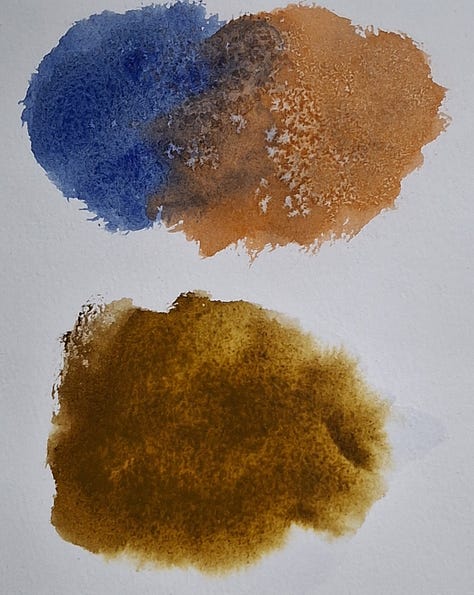
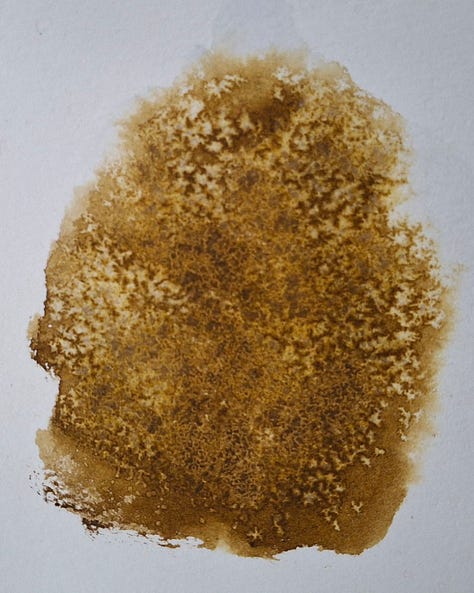
This creates lighter spots where the salt sits, and darker rings or outlines around the granules
The resulting texture appears as a burst or crystal-like effect
💡 The effect depends on timing, moisture level, pigment type, and salt grain size.
3. Materials You’ll Need
✔ Watercolour paper (preferably cold-pressed)
✔ Transparent or staining pigments (try Cobalt Blue, Burnt Sienna, or Phthalo Blue)
✔ Table salt or coarse sea salt
✔ Brushes and clean water
✔ Patience (it must dry fully before brushing off the salt!)
4. Step-by-Step Guide to the Salt Technique
🎨 Step 1: Paint Your Wash
Apply a generous, even wash of watercolor on your paper. The area should be wet, but not puddling.
🎨 Step 2: Wait for the Right Moment
Let the wash soak in for 30–60 seconds—not too wet, not too dry. If you sprinkle salt too early, it will dissolve or spread unevenly. Too late, and it won’t create texture.
🎨 Step 3: Sprinkle the Salt
Sprinkle lightly and evenly over the damp surface. Try different grain sizes (fine table salt vs. sea salt) for varied effects.
🎨 Step 4: Let It Dry Naturally
Do not disturb the paper while drying. The magic happens slowly as the water evaporates and salt draws pigment.
🎨 Step 5: Brush Off the Salt
Once fully dry, gently brush off the salt with your hand or a soft cloth. You’ll see a stunning, organic texture left behind.
5. Tips for Best Results
✅ Test on a sample swatch to understand timing
✅ Use transparent pigments for clearer effects
✅ Avoid using too much salt—a small amount is often more effective
✅ Let the area air-dry for best results (a hairdryer may interrupt the absorption pattern)
✅ Try combining with other techniques like wet-on-wet or masking fluid
💡 Every application of salt is different—embrace the unexpected beauty!
6. When and Where to Use the Salt Technique
✔ Sky Textures – Add drama to evening or night skies
✔ Rocks and Earth – Create weathered textures in landscapes
✔ Abstract Backgrounds – For dreamy, ethereal effects
✔ Rust and Decay – Mimic corrosion or patina on metal surfaces
✔ Underwater or Ocean Scenes – Evoke the feeling of bubbles, foam, or currents
🎯 The salt technique is excellent for creating atmosphere and texture without hard outlines.
7. Variations and Creative Extensions
✨ Colored Salt – Pre-stain your salt with watercolor and let it dry before sprinkling
✨ Layered Salt Technique – Use it over multiple layers for complex textures
✨ Salt + Alcohol – Combine with rubbing alcohol for unpredictable, magical blends
✨ Mask and Salt – Mask out areas and salt the rest for dramatic contrasts
💡 With creativity, salt becomes a powerful artistic tool—not just a gimmick.
8. Common Mistakes to Avoid
🚫 Sprinkling salt on paper that is too wet (causes spreading or dilution)
🚫 Using salt on rough paper with uneven washes (can cause patchy textures)
🚫 Not waiting long enough before brushing off the salt
🚫 Overusing the technique, which may distract from the main subject
🎯 Use salt sparingly and strategically—let it enhance, not overpower.
Final Thoughts: Let the Unexpected Delight You
The salt technique in watercolour reminds us that not everything must be controlled. Sometimes, art shines brightest when we let go and allow the medium to surprise us.
✔ It teaches patience
✔ It embraces imperfection
✔ It introduces natural, complex textures effortlessly
✔ And most of all—it’s fun and deeply satisfying to watch unfold
So next time you’re painting, don’t forget to keep a pinch of salt nearby—not just for texture, but for that touch of artistic magic only watercolor can offer.
🎨 Call to Action: Join My Watercolor Mastery Community!
Want to learn techniques like salt texturing, glazing, layering, and expressive brushwork—step-by-step?
Join my Watercolor Mastery Community, where I help students:
✅ Explore unique techniques to build their style
✅ Practice playfully and purposefully
✅ Grow their skills through guidance, challenges, and community support
📩 Subscribe to my blog today for more tips, tutorials, and updates on my exclusive watercolor programs.
✨ Let’s discover the magic hidden in every grain of pigment—and salt—together! 🎨💫


super. do you have any youtube channel where you share your small tips sir?